Leere Seite erstellt |
Keine Bearbeitungszusammenfassung |
||
| (2 dazwischenliegende Versionen desselben Benutzers werden nicht angezeigt) | |||
| Zeile 1: | Zeile 1: | ||
{{BSVersion|bsvFrom=Galaxy}} | |||
PlantUML ist eine textbasierte Beschreibungssprache, mit der sich Diagramme wie Abläufe, Sequenz- oder Klassendiagramme allein durch Code erstellen lassen, ohne Formen von Hand zu zeichnen. | |||
== PlantUML Diagramm anlegen == | |||
So fügen Sie PlantUML-Code im Drawio-Editor ein: | |||
# Erstellen Sie zuerst ein neues leeres Diagramm (siehe Anleitung [[Handbuch:Erweiterung/DrawioEditor#Drawio-Editor einbinden|Drawio-Editor einbinden]]) | |||
# Wählen Sie im geöffneten Drawio-Editor "'''Einfügen"''' und danach "'''Erweitert"'''. | |||
# Klicken Sie auf "'''PlantUML …'''."[[Datei:Erweiterung DrawioEditor - PlantUML Menü.png|alternativtext=geöffneter Drawio-Editor mit ausgewähltem PlantUML Menüpunkt|zentriert|mini|650x650px|PlantUML Menüpunkt]] | |||
# Geben Sie im Dialogfenster den PlantUML-Code ein. Beispiel Bestellprozess:<syntaxhighlight lang="text"> | |||
@startuml Bestellprozess | |||
autonumber 1 "0" | |||
skinparam BoxPadding 10 | |||
skinparam ParticipantPadding 10 | |||
skinparam RoundCorner 6 | |||
skinparam SequenceMessageAlign center | |||
skinparam Shadowing false | |||
skinparam sequence { | |||
ArrowColor #2C3E50 | |||
LifeLineBorderColor #34495E | |||
LifeLineBackgroundColor #F8F9FA | |||
ParticipantBackgroundColor #EBF5FB | |||
ParticipantBorderColor #2980B9 | |||
ParticipantFontColor #2C3E50 | |||
ParticipantFontSize 13 | |||
} | |||
' --- TEILNEHMER --- | |||
actor "Kunde" as Kunde #ActiveCaption | |||
box "Webseite + API" #F4F6F7 | |||
participant "Frontend" as UI | |||
participant "Gateway" as GW | |||
end box | |||
box "Kern-System" #EAEDED | |||
participant "Bestellung" as Service | |||
database "Datenbank" as DB #D5F5E3 | |||
end box | |||
' --- ABLAUF --- | |||
Kunde -> UI : Button "Jetzt kaufen" klicken | |||
activate UI | |||
UI -> GW : POST /order (Warenkorb) | |||
activate GW | |||
GW -> Service : Bestellung anlegen | |||
activate Service | |||
Service -> DB : Daten speichern | |||
activate DB | |||
DB --> Service : Bestätigt | |||
deactivate DB | |||
Service --> GW : HTTP 201 (Erstellt) | |||
deactivate Service | |||
GW --> UI : Erfolg zurückgeben | |||
deactivate GW | |||
UI --> Kunde : Bestätigung anzeigen | |||
deactivate UI | |||
@endum | |||
</syntaxhighlight> | |||
# Klicken Sie im Dialog auf "'''Anwenden'''". | |||
# Wichtig! Speichern Sie das Diagramm über die Schaltfläche "'''Speichern'''". | |||
# Klicken Sie anschließend auf "'''Beenden"'''. | |||
Ausgabe: | |||
[[Datei:Erweiterung DrawioEditor PlantUML - Ausgabe.png|alternativtext=Ausgabe des Beispieldiagramms Bestellprozess|zentriert|mini|850x850px|PlantUML Diagramm]] | |||
Aktuelle Version vom 29. September 2026, 09:31 Uhr
PDF-Ausschluss - Start
PDF-Ausschluss - Ende
PlantUML ist eine textbasierte Beschreibungssprache, mit der sich Diagramme wie Abläufe, Sequenz- oder Klassendiagramme allein durch Code erstellen lassen, ohne Formen von Hand zu zeichnen.
PlantUML Diagramm anlegen
So fügen Sie PlantUML-Code im Drawio-Editor ein:
- Erstellen Sie zuerst ein neues leeres Diagramm (siehe Anleitung Drawio-Editor einbinden)
- Wählen Sie im geöffneten Drawio-Editor "Einfügen" und danach "Erweitert".
- Klicken Sie auf "PlantUML …."
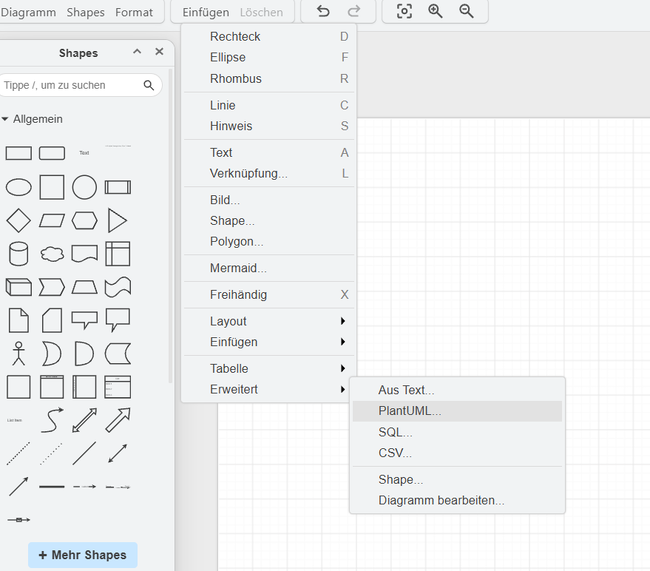
PlantUML Menüpunkt - Geben Sie im Dialogfenster den PlantUML-Code ein. Beispiel Bestellprozess:
@startuml Bestellprozess autonumber 1 "0" skinparam BoxPadding 10 skinparam ParticipantPadding 10 skinparam RoundCorner 6 skinparam SequenceMessageAlign center skinparam Shadowing false skinparam sequence { ArrowColor #2C3E50 LifeLineBorderColor #34495E LifeLineBackgroundColor #F8F9FA ParticipantBackgroundColor #EBF5FB ParticipantBorderColor #2980B9 ParticipantFontColor #2C3E50 ParticipantFontSize 13 } ' --- TEILNEHMER --- actor "Kunde" as Kunde #ActiveCaption box "Webseite + API" #F4F6F7 participant "Frontend" as UI participant "Gateway" as GW end box box "Kern-System" #EAEDED participant "Bestellung" as Service database "Datenbank" as DB #D5F5E3 end box ' --- ABLAUF --- Kunde -> UI : Button "Jetzt kaufen" klicken activate UI UI -> GW : POST /order (Warenkorb) activate GW GW -> Service : Bestellung anlegen activate Service Service -> DB : Daten speichern activate DB DB --> Service : Bestätigt deactivate DB Service --> GW : HTTP 201 (Erstellt) deactivate Service GW --> UI : Erfolg zurückgeben deactivate GW UI --> Kunde : Bestätigung anzeigen deactivate UI @endum - Klicken Sie im Dialog auf "Anwenden".
- Wichtig! Speichern Sie das Diagramm über die Schaltfläche "Speichern".
- Klicken Sie anschließend auf "Beenden".

Ausgabe:




